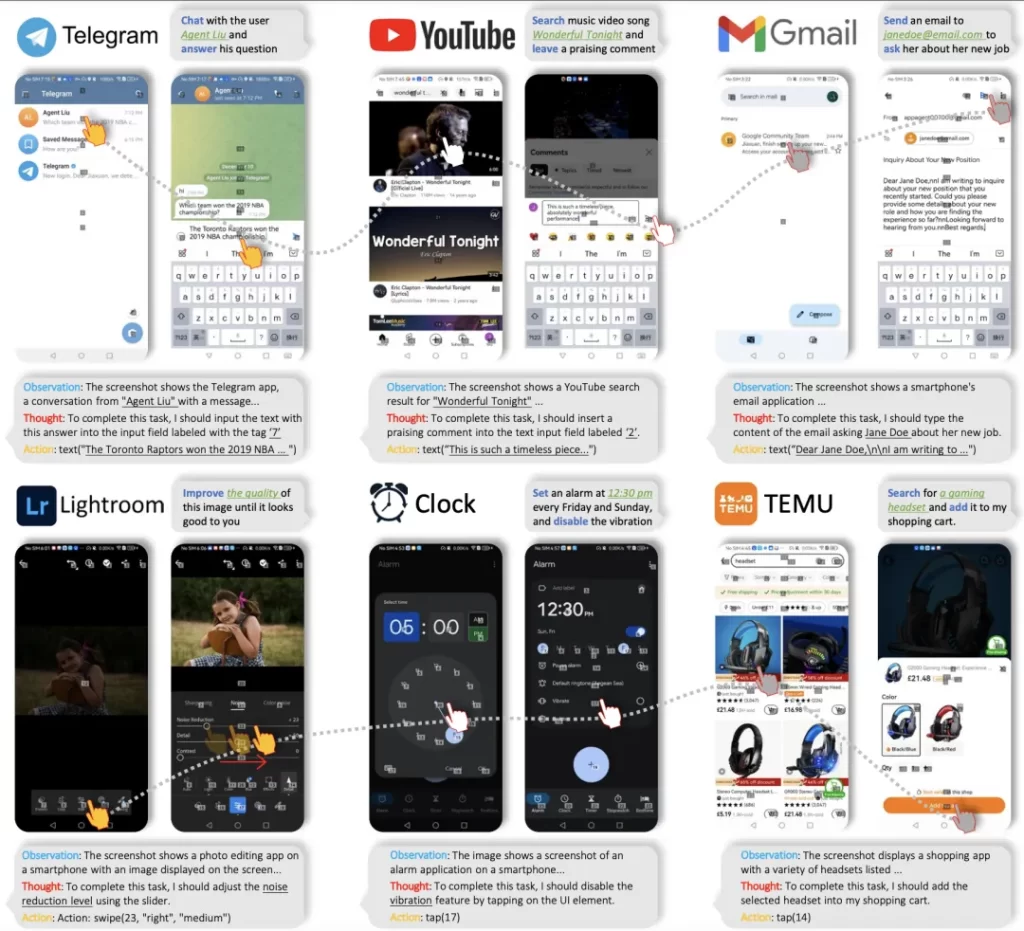
AppAgent is an innovative multimodal intelligent agent framework developed by Tencent’s research team. Built on large language models (LLMs), it enables intelligent agents to interact with and operate smartphone applications, enhancing their interactivity and intelligence.
The framework allows agents to operate smartphone apps by mimicking human interactions such as tapping and swiping. Agents can master app usage through autonomous learning or by observing human operations.
AppAgent can quickly adapt to new apps and perform various complex tasks, including social media, email, map navigation, image editing, and more.

Versatile Use Cases
The flexibility and multimodal learning capabilities of AppAgent make it a versatile tool with a wide range of potential applications, including but not limited to:
App Testing
AppAgent can be used for automated testing by simulating user interactions with apps to check functionality and performance.
Assistive Technology
For users with visual or motor impairments, AppAgent can assist them in using smartphone apps more conveniently.
Productivity Enhancement
In work environments, AppAgent can help users automate repetitive tasks, boosting productivity.
User Experience Improvement
Developers can utilize AppAgent to simulate different user interaction paths to identify and improve the user experience of their apps.
Monitoring Tool
AppAgent can be used to monitor app resource usage in real-time, helping developers quickly pinpoint performance bottlenecks.
Research and Development
AppAgent provides a platform for researchers to explore new methods of multimodal learning and human-computer interaction.
How to Use AppAgent
Prerequisites
- On your PC, download and install Android Debug Bridge (ADB), a command-line tool that allows communication between a PC and Android devices.
- Prepare an Android device and enable USB debugging in the developer options settings.
- Connect the device to your PC using a USB cable.
- (Optional) If you don’t have an Android device but still want to try AppAgent, download Android Studio and use the emulator that comes with it. You can find the emulator in Android Studio’s Device Manager. Install apps on the emulator by downloading APK files from the internet and dragging them onto the emulator. AppAgent can detect the emulated device and operate apps on it just like on a real device.
- Clone the AppAgent repository and install the dependencies. All scripts in this project are written in Python 3, so make sure you have it installed.
cd AppAgent
pip install -r requirements.txt
Configuring the Agent
AppAgent requires a multimodal model to drive it, which can receive both text and visual inputs. In the project’s experiments, gpt-4-vision-preview was used as the model to decide how to take actions on the smartphone to complete tasks.
To configure requests to GPT-4V, modify config.yaml in the root directory. Two key parameters must be configured to try AppAgent:
- OpenAI API Key: You must purchase a qualified API key from OpenAI to access GPT-4V.
- Request Interval: This is the time interval (in seconds) between consecutive GPT-4V requests, used to control the request frequency to GPT-4V. Adjust this value based on your account status.
Other parameters in config.yaml are annotated in detail and can be modified as needed.
Note that GPT-4V is not free. Each request/response pair involved in this project costs approximately $0.03. Use it wisely.
You can also try using qwen-vl-max (Tongyi Qianwen-VL) as an alternative multimodal model to drive AppAgent. This model is currently free to use but has relatively poorer performance compared to GPT-4V in the context of AppAgent.
To use it, create an Alibaba Cloud account and create a Dashscope API key to fill in the DASHSCOPE_API_KEY field in config.yaml. Also, change the MODEL field from OpenAI to Qwen.
If you want to test AppAgent with your own model, you can write a new model class accordingly in scripts/model.py.
Exploration Phase
The project proposes a novel solution involving two phases: exploration and deployment. The exploration phase starts with the task you provide, and you can choose to let the agent explore the app autonomously or learn from your demonstration. In either case, the agent will generate documentation for the elements it interacts with during exploration/demonstration and save them for use in the deployment phase.
Option 1: Autonomous Exploration
This solution features fully autonomous exploration, allowing the agent to attempt the given task without any human intervention.
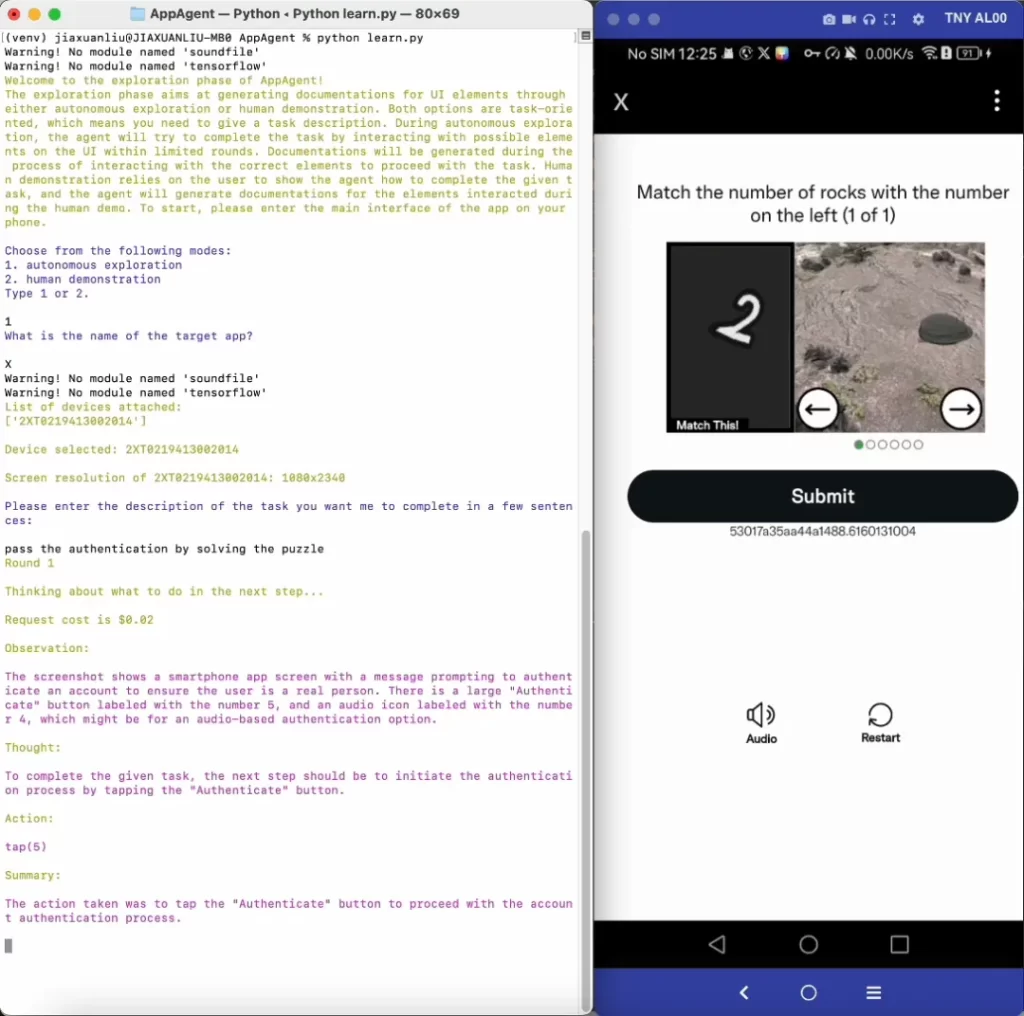
Run learn.py in the root directory, follow the prompts to select “autonomous exploration” as the operation mode, and provide the app name and task description. The agent will then do the work for you. In this mode, AppAgent will reflect on its previous actions, ensure its actions align with the given task, and generate documentation for the explored elements.
python learn.pyOption 2: Learning from Human Demonstration
This solution requires the user to first demonstrate a similar task. AppAgent will learn from the demonstration and generate documentation for the UI elements seen during the demonstration.
Run learn.py in the root directory, follow the prompts to select “human demonstration” as the operation mode, and provide the app name and task description. This will capture screenshots of your phone and mark numeric labels on all interactive elements displayed on the screen. You need to follow the prompts to determine your next action and the target of the action. When you feel the demonstration is complete, enter “stop” to end the demonstration.
python learn.pyDeployment Phase
After the exploration phase is complete, you can run run.py in the root directory. Follow the prompts to input the app name, select the appropriate documentation library used by the agent, and provide the task description. The agent will then do the work for you. The agent will automatically detect if documentation has been previously generated for the app; if no documentation is found, you can also choose to run the agent without documentation (success rate not guaranteed).
python run.pyTips for Better Results
- For an improved experience, allow AppAgent to undertake a broader range of tasks through autonomous exploration, or directly demonstrate more app functions to enhance the app documentation. Generally, the more extensive the documentation provided to the agent, the higher the likelihood of successful task completion.
- It’s always a good habit to inspect the documentation generated by the agent. When you find some documentation not accurately describing the function of an element, manually revising the documentation is also an option.
Project Demos
The project provides demonstration videos showcasing the use of AppAgent in the deployment phase, including following users, passing CAPTCHAs, and using grid overlays to locate unmarked UI elements.

Note: The content of this article is for reference only. For the latest project features, please refer to the official GitHub page.


